 Save to Pinterest
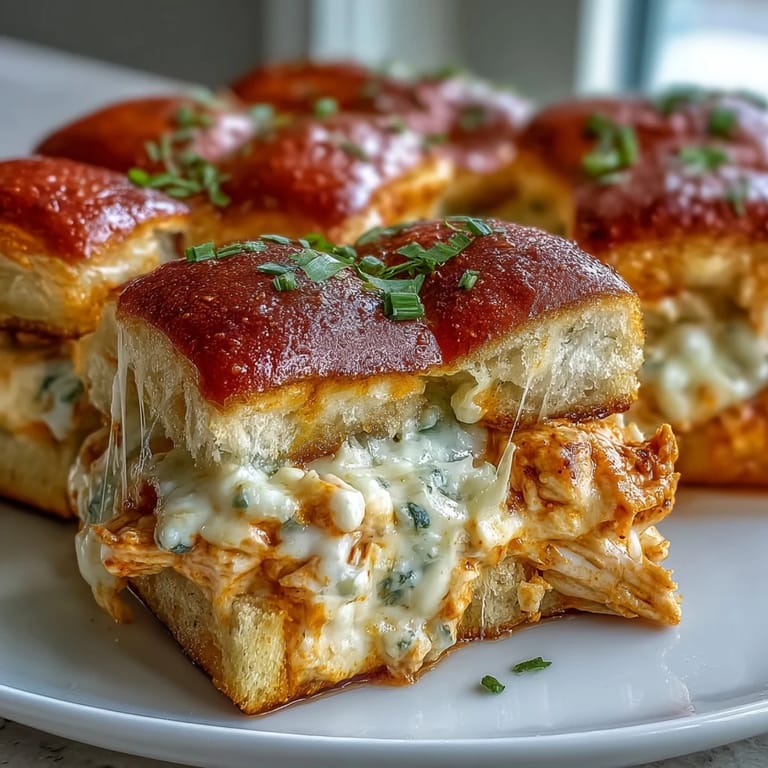
 My neighbor showed up at our block party last year with a foil-covered pan that had everyone circling back for seconds before the burgers even came off the grill. These sliders disappeared so fast she had to text me the recipe that night while I was still cleaning up. The genius is in how the creamy Buffalo chicken dip soaks into those soft buns while everything bakes together into one glorious, cheesy pull-apart situation. I've made them for three different gatherings since then, and each time someone asks if I'm bringing those sliders again. They're the kind of thing you can throw together without stress and still look like you planned something special.
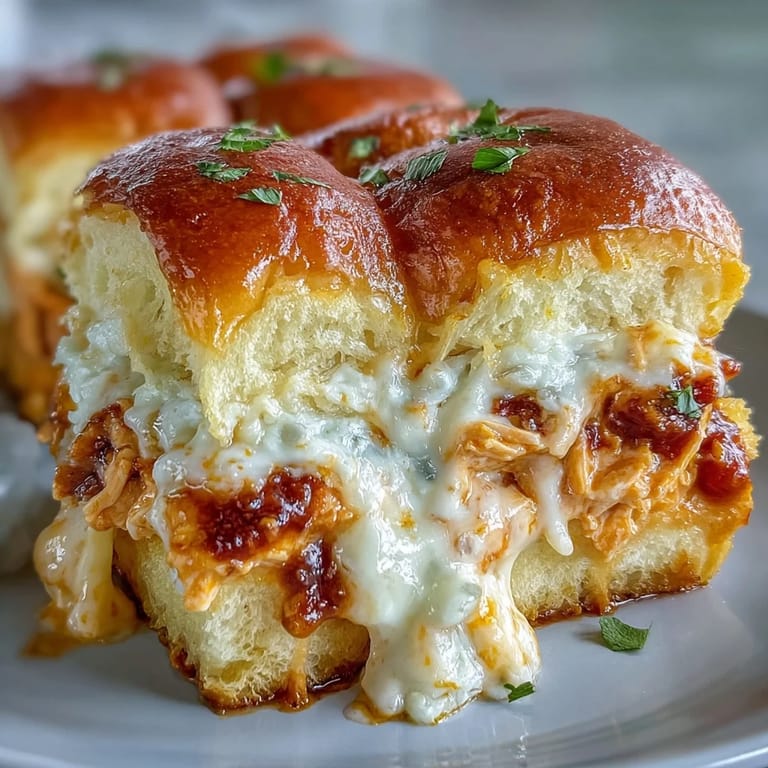
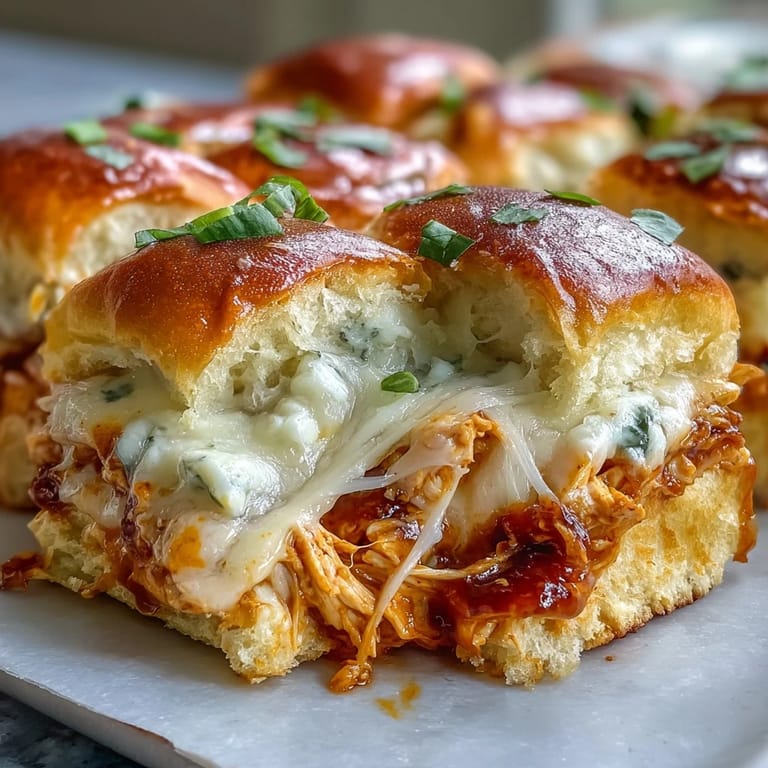
The first time I made these for my family, my teenager wandered into the kitchen halfway through baking and asked why it smelled like our favorite wing place. When I pulled them out of the oven all golden and bubbling, he grabbed one before they even cooled and declared them better than anything we'd ordered out. My husband, who normally doesn't get excited about appetizers, ate four in a row and suggested we skip dinner entirely. Now they've become our unofficial Sunday football tradition, and I've started doubling the batch because leftovers never make it to Monday.
Ingredients
- Cooked chicken breast, shredded: Rotisserie chicken is your best shortcut here and adds a little extra flavor from the seasoning, though poached or leftover grilled chicken works just as well.
- Buffalo wing sauce: This is what gives the sliders their signature tangy kick, and using a quality brand makes a noticeable difference in how the flavors come through.
- Cream cheese, softened: Let it sit on the counter for at least 30 minutes so it blends smoothly without lumps, or soften it in the microwave for 10 seconds if you're in a rush.
- Ranch dressing: The cool creaminess balances the heat from the Buffalo sauce, and you can swap in blue cheese dressing if that's more your style.
- Sour cream: It adds a subtle tang and keeps the dip from feeling too heavy or one note.
- Shredded mozzarella cheese: Mozzarella melts beautifully and creates those irresistible cheese pulls when you separate the sliders.
- Shredded cheddar cheese: Sharp cheddar brings a deeper flavor that stands up to the Buffalo sauce and keeps things interesting.
- Slider buns: Hawaiian rolls are my go to because they're soft and slightly sweet, which contrasts perfectly with the spicy dip, but any soft dinner rolls work.
- Unsalted butter, melted: Brushing this on top gives the buns a golden, slightly crispy finish that's hard to resist.
- Garlic powder: Just a little mixed into the butter adds a savory note that makes the tops taste like garlic bread.
- Chopped fresh parsley: This is optional but adds a pop of color and a fresh note that makes the finished sliders look more polished.
Tired of Takeout? 🥡
Get 10 meals you can make faster than delivery arrives. Seriously.
One email. No spam. Unsubscribe anytime.
Instructions
- Preheat and Prep:
- Set your oven to 350°F and lightly grease a 9x13 inch baking dish so nothing sticks. This is also a good time to pull out your ingredients and get everything within reach.
- Mix the Buffalo Chicken Dip:
- In a large bowl, combine the shredded chicken with Buffalo sauce, softened cream cheese, ranch dressing, and sour cream, stirring until it's creamy and everything is evenly coated. Fold in half of the mozzarella and cheddar so the dip is studded with melty pockets of cheese.
- Prepare the Buns:
- Slice the slider buns in half horizontally, keeping the bottoms and tops connected as one sheet if you can (this makes assembly so much easier). Place the bottom halves flat in your prepared baking dish.
- Assemble the Sliders:
- Spread the Buffalo chicken mixture evenly over the bottom buns, making sure to get it all the way to the edges. Sprinkle the remaining mozzarella and cheddar over the top, then gently place the top halves of the buns over everything like a blanket.
- Butter the Tops:
- Mix the melted butter with garlic powder and brush it generously over the tops of the buns. Don't skip this step because it's what gives you that golden, garlicky crust.
- Bake Covered:
- Cover the dish with foil and bake for 15 minutes, which lets the dip heat through and the cheese start melting without the tops browning too fast. The foil traps steam and keeps the buns soft inside.
- Finish Uncovered:
- Remove the foil and bake for another 8 to 10 minutes until the cheese is bubbly and the tops turn golden brown. Keep an eye on them in the last few minutes so they don't over darken.
- Garnish and Serve:
- Sprinkle with chopped parsley if you like, then slice between the buns and serve warm. They're best enjoyed right away while the cheese is still gooey.
 Save to Pinterest
 I brought these to a potluck last spring, and a friend who's usually pretty reserved about food pulled me aside to ask if I'd make them for her birthday party. She said her husband had already asked her twice when we were invited back because he couldn't stop thinking about them. That's when I realized these sliders have a way of making people feel taken care of, like comfort food that also feels a little indulgent and fun.
How to Store and Reheat
If you somehow end up with leftovers, let the sliders cool completely before wrapping the pan tightly in foil or transferring them to an airtight container. They'll keep in the fridge for up to three days, though the buns will soften a bit more as they sit. To reheat, place them in a 300°F oven for about 10 minutes until warmed through, or pop individual sliders in the microwave for 20 to 30 seconds if you're in a hurry. The oven method will help crisp up the tops again, but honestly they're still delicious either way.
Make Ahead Tips
You can assemble the entire pan of sliders up to the point of baking, then cover tightly and refrigerate for up to six hours before your event. When you're ready, just brush on the garlic butter and bake as directed, adding an extra few minutes if they're going in cold from the fridge. I've done this for evening gatherings where I didn't want to be stuck in the kitchen, and it works perfectly. Just remember to pull them out about 20 minutes before baking so they're not ice cold, which helps them heat more evenly.
Variations and Swaps
If you want to dial up the heat, add a few dashes of your favorite hot sauce to the dip or use a spicier Buffalo sauce. For a smoky twist, stir in some crumbled cooked bacon or a handful of chopped green onions before spreading the mixture on the buns. You can also swap the ranch for blue cheese dressing if you love that classic Buffalo wing pairing, or use pepper jack cheese in place of the cheddar for a little extra kick.
- Try adding diced celery right into the dip for crunch and that authentic Buffalo wing vibe.
- Swap Hawaiian rolls for pretzel buns if you want a heartier, slightly salty base.
- For a lighter version, use Greek yogurt in place of the sour cream and reduce the amount of cheese slightly.
 Save to Pinterest
 These sliders have become the thing I bring when I want to show up with something people will actually remember, not just another dish on a crowded table. They're easy enough for a weeknight but special enough that everyone assumes you spent way more time than you did.
Recipe FAQs
- → Can I use rotisserie chicken for this dish?
Yes, rotisserie chicken works perfectly and saves time. Simply shred the meat and mix it with the Buffalo sauce and creamy ingredients as directed.
- → What type of buns work best for these sliders?
Hawaiian rolls are ideal due to their soft, slightly sweet texture, but any soft dinner rolls or slider buns will work well for this preparation.
- → How can I adjust the spice level?
Reduce the amount of Buffalo wing sauce for milder sliders, or add extra hot sauce and cayenne pepper to the dip mixture for more heat.
- → Can these sliders be prepared ahead of time?
Yes, assemble the sliders completely, cover tightly with foil, and refrigerate up to 24 hours before baking. Add a few extra minutes to the baking time if starting from cold.
- → What should I serve alongside these sliders?
Celery and carrot sticks with ranch or blue cheese dressing make classic accompaniments. Tortilla chips, pickles, or a fresh green salad also pair wonderfully.
- → How do I store and reheat leftovers?
Store leftover sliders in an airtight container in the refrigerator for up to 3 days. Reheat in a 325°F oven covered with foil until warmed through, about 10-12 minutes.