 Save to Pinterest
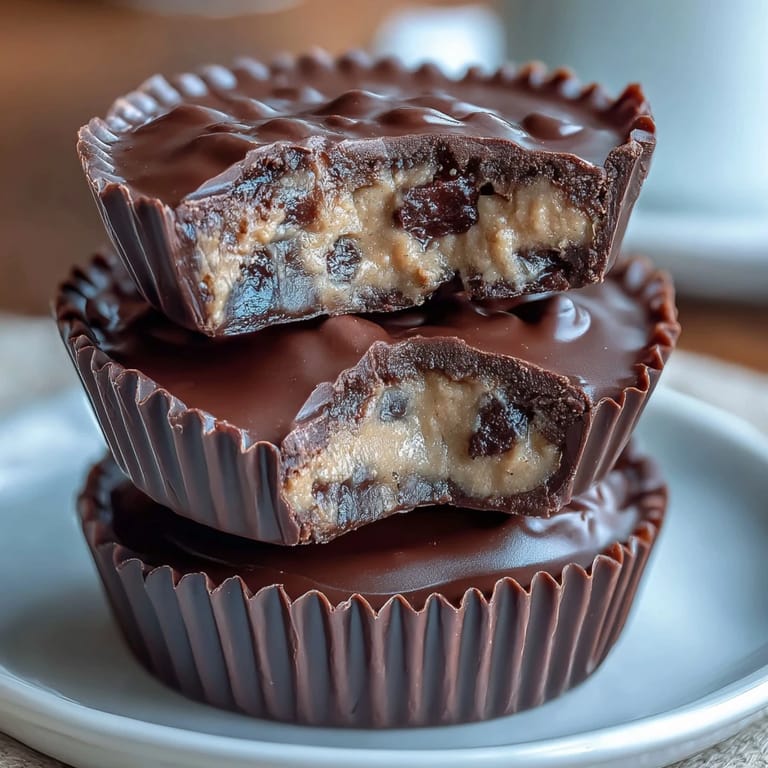
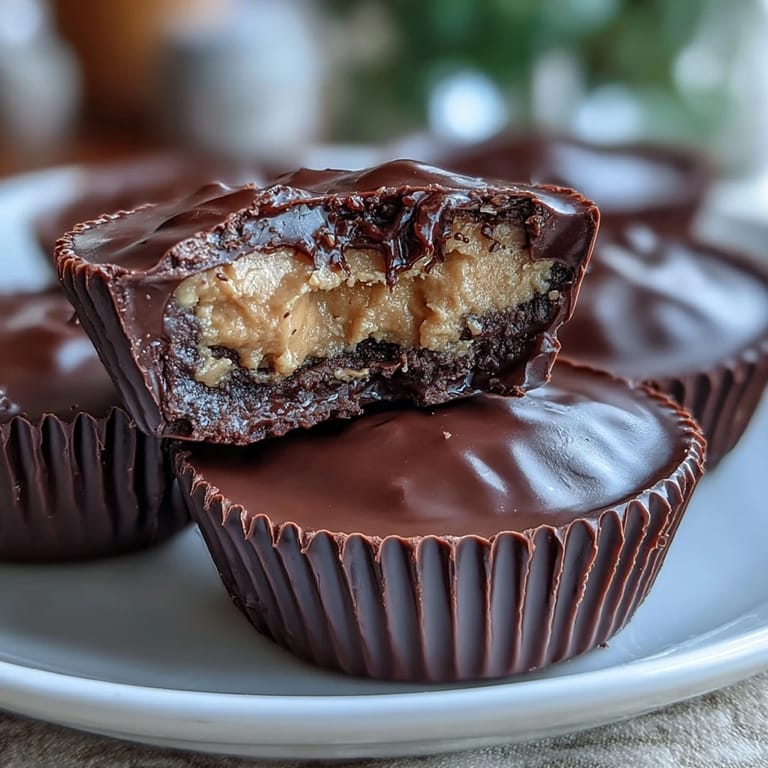
 There's something deeply satisfying about biting into a homemade peanut butter cup—the snap of rich dark chocolate giving way to a creamy, lightly salted peanut butter center. These Homemade Reese's Peanut Butter Cups with Dark Chocolate bring that iconic sweet-and-salty combination into your own kitchen, with a gourmet twist that outshines any store-bought version. Made with premium 70% dark chocolate and a velvety peanut butter filling, these cups are surprisingly simple to create and endlessly customizable. Whether you're looking for a quick dessert to impress guests, a thoughtful homemade gift, or just a way to satisfy your chocolate cravings with real ingredients, this recipe delivers pure indulgence in every bite.
Save to Pinterest The beauty of these peanut butter cups lies in their versatility. The recipe calls for unsweetened, unsalted peanut butter, which allows you to control the sweetness and salt levels perfectly. The addition of softened butter to the filling creates an ultra-smooth texture that melts on your tongue, while a touch of vanilla extract adds warmth and depth. The optional coconut oil mixed into the melted chocolate ensures a glossy finish and helps the shells set with that satisfying snap. Best of all, these treats store beautifully in the refrigerator for up to a week, making them ideal for meal prep or advance party planning.
Ingredients
Tired of Takeout? 🥡
Get 10 meals you can make faster than delivery arrives. Seriously.
One email. No spam. Unsubscribe anytime.
- Chocolate Layer: 250 g (9 oz) dark chocolate (70% cocoa or higher), chopped, and 1 tbsp coconut oil (optional, for smoother texture)
- Peanut Butter Filling: 120 g (½ cup) creamy peanut butter (unsweetened, unsalted preferred), 2 tbsp unsalted butter (softened), 60 g (½ cup) powdered sugar (sifted), ¼ tsp fine sea salt, and ½ tsp vanilla extract
Instructions
- Step 1: Prepare the muffin tin
- Line a 12-cup mini muffin tin with paper liners to prevent sticking and make removal easy.
- Step 2: Melt the chocolate
- Melt the dark chocolate and coconut oil together in a heatproof bowl set over a pan of simmering water, or microwave in short bursts, stirring until smooth.
- Step 3: Form the chocolate bases
- Spoon about 1 teaspoon of melted chocolate into the bottom of each muffin liner. Tilt or use a spoon to coat the sides slightly. Chill in the freezer for 10 minutes to set.
- Step 4: Make the peanut butter filling
- Meanwhile, in a medium bowl, mix peanut butter, butter, powdered sugar, salt, and vanilla extract until smooth and thick.
- Step 5: Add the filling layer
- Roll about 1 teaspoon of the peanut butter mixture into a ball, flatten slightly, and place onto the set chocolate bases. Gently press down to create an even layer, leaving a small border around the edge.
- Step 6: Seal with chocolate
- Spoon the remaining melted chocolate over the peanut butter layers, covering completely. Tap the tin gently to smooth the tops.
- Step 7: Chill until set
- Chill in the refrigerator for at least 30 minutes, or until fully set.
- Step 8: Serve and store
- Remove cups from liners and serve. Store in an airtight container in the refrigerator for up to 1 week.
Zusatztipps für die Zubereitung
To ensure the smoothest chocolate shells, make sure your chocolate is finely chopped before melting—this helps it melt evenly without scorching. If using a double boiler, keep the heat low and stir frequently. When spooning the initial chocolate layer into the liners, work quickly before it begins to set, and don't worry about perfect coverage—a rustic look adds homemade charm. For the peanut butter filling, ensure your butter is properly softened to room temperature so it blends seamlessly. If the filling feels too soft to handle, refrigerate it for 5-10 minutes before rolling. When sealing the cups with the final chocolate layer, use the back of a spoon to gently spread and smooth the tops for a professional finish.
Varianten und Anpassungen
This recipe is wonderfully adaptable to suit different tastes and dietary needs. For a vegan version, simply swap the unsalted butter for a plant-based alternative and ensure your dark chocolate is dairy-free. If you prefer a sweeter cup, use milk chocolate or a 60% dark chocolate instead of 70%. Nut butter enthusiasts can experiment with almond butter, cashew butter, or even sunflower seed butter for a nut-free option. For an extra layer of flavor, try adding a pinch of cinnamon or espresso powder to the peanut butter filling. You can also create a salted caramel version by drizzling a little caramel sauce over the peanut butter layer before sealing with chocolate, or add a sprinkle of flaky sea salt on top before the final chill for a gourmet touch.
Serviervorschläge
These homemade peanut butter cups are incredibly versatile when it comes to serving. Enjoy them straight from the fridge as a quick afternoon pick-me-up, or arrange them on a dessert platter alongside fresh berries and whipped cream for an elegant finish to a dinner party. They pair beautifully with a hot cup of coffee or espresso, as the bitterness of the dark chocolate complements the rich, roasted notes of the beans. For a nostalgic treat, serve them with a tall glass of cold milk. These cups also make thoughtful homemade gifts—package them in a decorative tin or box lined with parchment paper, and they're perfect for holidays, birthdays, or teacher appreciation. If you're hosting a dessert bar, set out a tray of these alongside brownies, cookies, and fruit for a crowd-pleasing spread.
 Save to Pinterest
 Making your own peanut butter cups at home is a rewarding experience that combines simplicity with gourmet results. With just a handful of quality ingredients and minimal equipment, you can create a treat that rivals any artisan chocolate shop. The process is forgiving and fun, making it a great project to tackle with kids or as a relaxing weekend activity. Once you master the basic technique, you'll find endless opportunities to experiment with flavors, textures, and presentations. Whether you enjoy them as a personal indulgence or share them with loved ones, these Homemade Reese's Peanut Butter Cups with Dark Chocolate are sure to become a staple in your dessert repertoire.
Recipe FAQs
- → What type of chocolate works best for the cups?
Dark chocolate with 70% cocoa or higher is ideal for a rich, intense flavor and smooth texture. You can melt it gently using a double boiler or microwave.
- → Can I substitute the peanut butter with other nut butters?
Yes, almond or cashew butter can be used for a different taste profile while keeping the creamy texture of the filling.
- → How do I prevent the chocolate from melting too quickly when handling?
Work in a cool environment and chill the cups after assembling to ensure the chocolate sets firmly and stays stable.
- → Is there an option to make these cups vegan?
Use dairy-free butter alternatives and check the chocolate is free from milk derivatives to create vegan-friendly cups.
- → What’s the purpose of adding sea salt to the filling?
Fine sea salt enhances the peanut butter’s flavor, balancing sweetness with a subtle savory note for a more complex taste.
- → How long should the cups chill before serving?
Chill the cups at least 30 minutes in the refrigerator to allow the chocolate to harden and the filling to firm up.